|
In this project we were tasked with creating a work of art that will be part of a four-piece cohesive collection to be displayed in our new STEM Science building. We started our project by brainstorming all the basic components of chemistry and then began narrowing them down to the ones we wanted to incorporate into our final product. The next major step of our brainstorming was thinking of all the different ways we could ultimately present out project. We talked about painting, sculptures, collages, drawing and so on. We kept in mind that
|
the final product we were going to create needed to be complete, cohesive and concise. This is when we thought of incorporating the name STEM into our pieces of art. We wanted the each letter to be researched by each member of our group and then create some sort of art piece around that word. As time went on in our project work days it became clear that this idea was very restrictive, so we decided to keep the general theme of STEM but add more of a creative twist. One of the main issues in completing our project was making paint. We wanted to make our own paint through chemical reactions and then use it to finish off our project by showcasing San Marin's school colors. We found out very quickly that this was a tough process to do successfully, and we struggled for a long time to get the right shade and work through the math of the chemical equations we were using. We then did research relating to the actual chemistry of some of our steps and art pieces, so we could connect what we were learning in class to the project at hand. Our final step was presenting all of our research and our cohesive piece of art. Below is the final presentation that we presented to our classmates and teacher.
Driving Question: How can we use chemistry to design a work of art for our new STEM building?
This was something that we continuously looked back upon and reflected through each step of our design process and project work days. It was really important to us that we remembered how chemistry is related to art, and use this idea to become artists through chemistry and science. In my opinion it was really interesting to look at the more technical side of art and experiencing how much work goes into just one small portion of this profession.
|
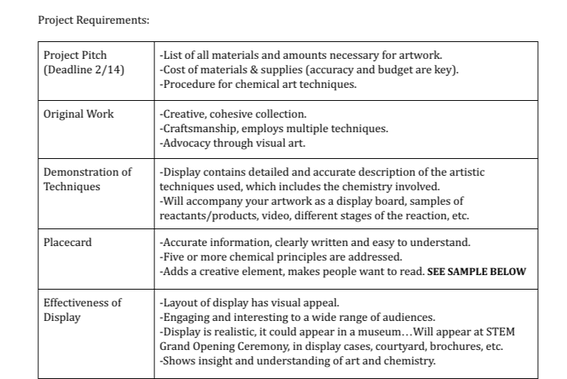
Throughout this entire project, we made sure to stick to the timeline we were given so we could complete everything without rushing or not putting our best final product out there. We were provided a guideline for all the criteria that was to be covered in our presentation and how our art work related to chemistry. Below is a copy of the project requirements that we were eventually graded on during our presentation and when we turned in our artwork. We also wanted to take this project seriously because these art pieces are going to be displayed in our new STEM building, so it was important that we did our best. |
|
Creating Our Artwork
We knew from the beginning that we wanted to incorporate the STEM letters and name into our final product in some way. After our brainstorming process, we moved on to deciding on an idea. We went through a lot of great concepts and ideas, but finally we settled on our favorite. For our project we wanted to create a standing display with the letters for STEM in the front and have them painted with homemade paints that we would produce with chemical reactions. On the back, to include some visual chemistry, we would make clay models of the molecular structure of the chemical reactions for each of the paints we made. We decided to make our paints first, because we knew this could take a long time. The two colors that we picked were Prussian Blue and Aurelion Yellow. We tried making a green paint, but we were unable to make any shade that was close to the shade we wanted, so we decided to mix a blue and yellow together and this helped us get the color we wanted. It took a lot of research to figure out how to balance the equations, but we did our best and below you can find the chemical formulas of the paint we created and used.
|
Yellow Reaction
|

A swatch of Aurelion Yellow
|
|
Blue Reaction
|

A swatch of Prussian Blue
|
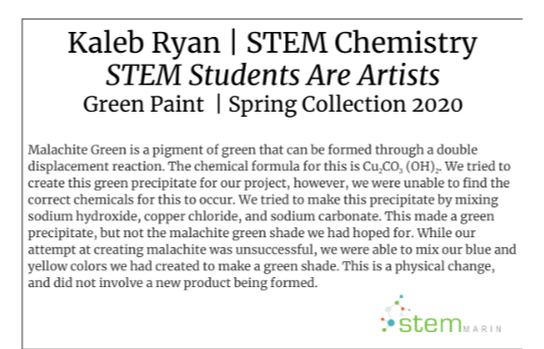
We wanted to make a green to go with the yellow pigment we had already created, however, this proved much more complicated and time consuming than we had anticipated. I was able to successfully make around four different shades of blue, but not any kind of green that we wanted. The color that we wanted to make was malachite green, which is the shade of green you can see in the pictures of our final work. In the end we had to mic the blue and yellow pigments together to form a green, and this can be classified as a physical change. There is actually no chemical reaction behind mixing pigments, since no new product is formed, only a new color of the same paint. Below is a brief description of how we worked around the issue of creating a green pigment, along with the reactants we used to create the shade located to the right.
|
Green Reaction
|
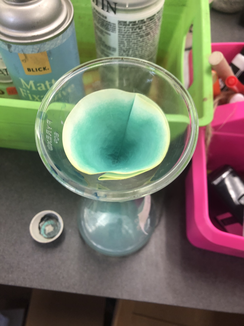
A picture of what our "green" precipitate looked like
|
The process of which we made paint was pretty straightforward and simple. First, we mixed the chemicals needed for reaction to occur. We found the chemicals needed after researching the chemical formula of the paint we wanted to create. This chemical reaction should form a precipitate. Then we filtered the new solution/product and let the precipitate collect in filter paper. We waited for the liquids to separate from the product by waiting a overnight for the precipitate to collect in the filter. We grinded up the dried pigment finely, added a paint base to it and started painting our letters. We found it was easier to add paint base on the wood first and then add the precipitate on top. This helped showcase the full effect of the color we had created.
After making the paint we used it to add school colors on the letters that would go in our display. Next, we needed to build the display case and make the sculpture molecules for the back side of the display. We divided up the work and worked diligently to get this next part of the project together. We build the display with some cardboard that we found in our classroom, but it looked a little drab with the letters resting in it so we decided to add some creativity and color to the board. We wrapped the cardboard in wrapping paper to give it a more unified look, and then we glued the letters down in the inside of the box. To add a little more to the presentation, one of my group members put some freehand doodles of objects that related to science, technology, engineering, and math. The clay we used was baked after we rolled it out, and then we glued it to the backside of the display case in the formation they are found in for the chemical reaction which created our pigments for the paint we used. There was a lot of trial and error in our project, but in the end everything came together and we did the best we could. Below are some pictures that we took of our art piece after presenting.
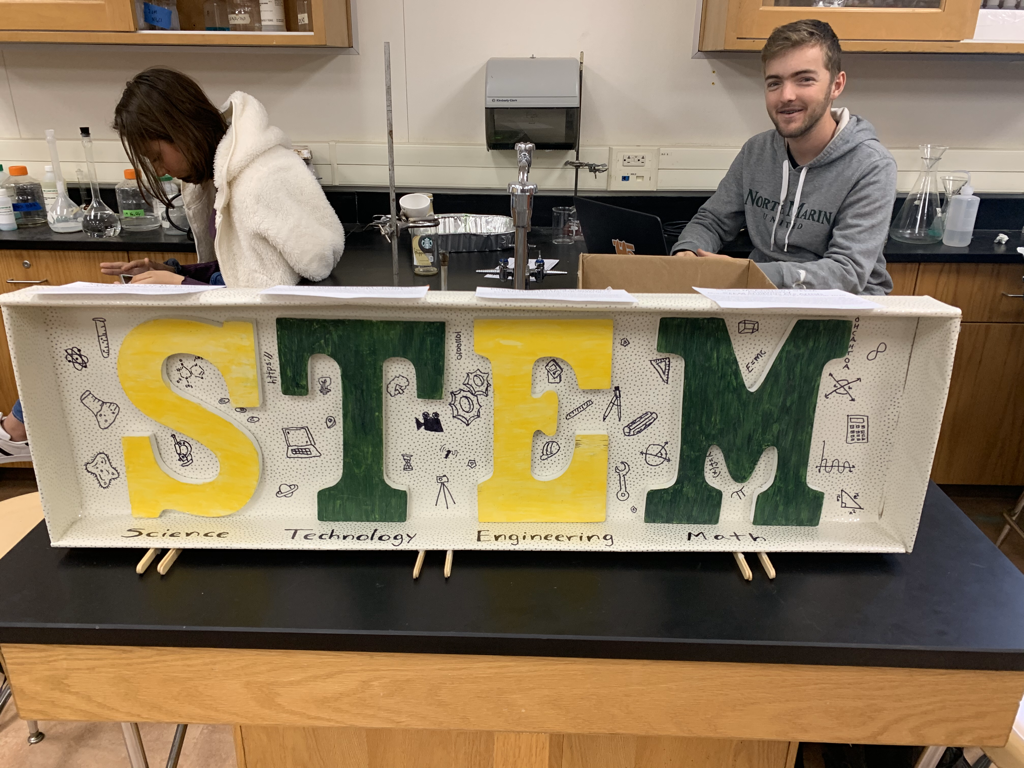
A view from the front
|
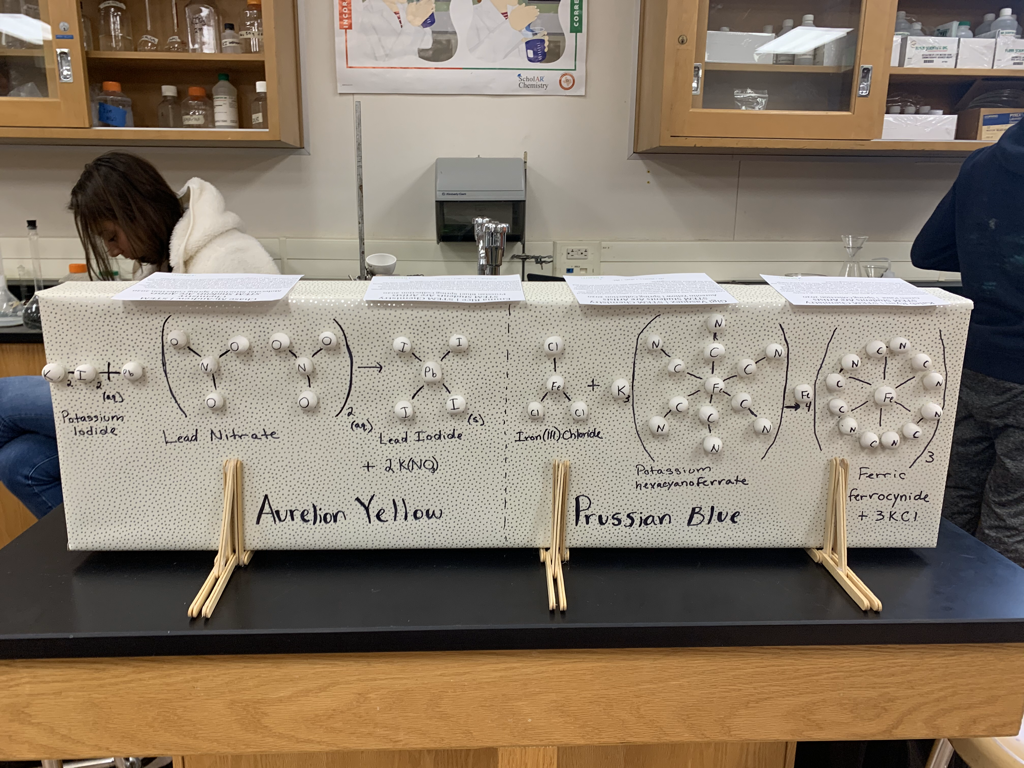
The molecular structures on the back
|
To Better Understand
Reactants- a substance that takes part in and undergoes change during a reaction. The reactants in our project included substances such as copper chloride and lead nitrate.
Products- the substance that is the result of a chemical reaction. The products for our project was the precipitates we formed to make the paint colors.
Ionic Compound- compounds made of ions, which will either gain or lose electrons and result in a positive or negative charge.
Chemical Reactions- a process in which one or more substances are converted to one or more different substances. Substances are either chemical elements or compounds. It rearranges the constituent atoms of the reactants to create different substances as products.
A precipitate is a solid formed when the cation and anion in an aqueous solution react to form an insoluble compound. It is important to note that a precipitate is not always a solid. The colors that we create through our chemical reactions were precipitate.
A double replacement reaction is a type of reaction that occurs when the cations and anions switch between two reactants to form new products. This was the type of chemical reaction that was involved in our paint making process.
A balanced equation is an equation for a chemical reaction in which the number of atoms for each element in the reaction and the total charge is the same for both the reactants and the products. In chemistry there are things called ions which is an atom that has some sort of electrical charge. The chemicals we used had a lot of ions in them, so our to figure out our product we had to balance the charges. In other words, the mass and the charge are balanced on both sides of the reaction. In writing a chemical equation you place the reactant(s) on the left and the product(s) after the arrow on the right hand side. For our project, we balanced the equations for the double replacement reactions we performed to create our paint pigments. Below are the balanced equations that we calculated.
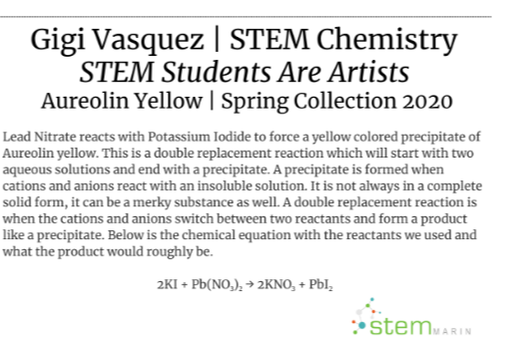
Aurelion Yellow:
2KI + Pb(NO₃)₂ → 2KNO₃ + PbI₂
The reactants for this reaction were potassium iodide and lead nitrate, and the product was 2KNO₃ + PbI₂.
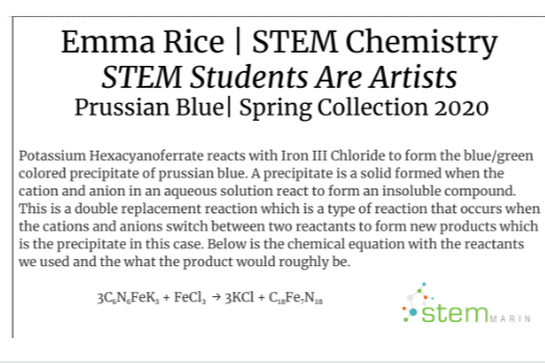
Prussian Blue:
3C₆N₆FeK₃ + FeCl₃ → 3KCl + C₁₈Fe₇N₁₈
The reactants for this reaction were potassium hexacyanoferrate and iron chloride, and the product was 3KCl + C₁₈Fe₇N₁₈.
Aurelion Yellow:
2KI + Pb(NO₃)₂ → 2KNO₃ + PbI₂
The reactants for this reaction were potassium iodide and lead nitrate, and the product was 2KNO₃ + PbI₂.
Prussian Blue:
3C₆N₆FeK₃ + FeCl₃ → 3KCl + C₁₈Fe₇N₁₈
The reactants for this reaction were potassium hexacyanoferrate and iron chloride, and the product was 3KCl + C₁₈Fe₇N₁₈.
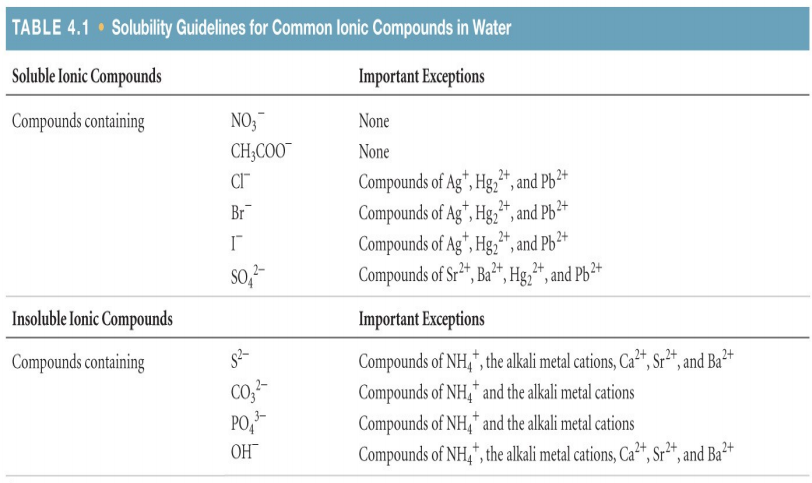
An image of the solubility guidelines
|
Solubility is a term used to describe a substance that will dissolve in an aqueous solution or another liquid. Ions will dissolve and dissociate in the solution. An example of something that is soluble would be salt, sugar, and even coffee grounds. If something is insoluble then it will not dissolve in water. An example of items that are insoluble would be sand, fat, and plastic. In chemistry there is this term called the Solubility Guidelines. These are rules of when a substance will dissolve in water and when they won't. If they do not dissolve they will form a precipitate. We followed the solubility guidelines in our project, because it allowed us to see if the chemical compounds we were mixing would form a precipitate. The image to the left is what the solubility guidelines looks like in a common textbook. It also includes some ionic compounds that have exceptions to their solubility.
|
The Science Behind Mixing Pigments
As mentioned before, we mixed the colors yellow and blue together to make green paint. It is important to note that pigments are chemicals that absorb selective wavelengths. There are the Primary Colors of Pigments (Subtractive Primaries) which include magenta, yellow, and cyan. When white light (composed of red, green, and blue light) shines on colored paint, only some of the wavelengths of light are reflected. Cyan paint absorbs red light but reflects blue and green light; yellow paint absorbs blue light but reflects red and green light. When cyan paint is mixed with yellow paint, you see green paint because both red and blue light are absorbed and only green light is reflected. Different colors of light have different wavelengths; thus, due to a chemical’s constitution, certain colors can be reflected and others are absorbed. This is really the basic overview of how by mixing pigments we could create green.
As mentioned before, we mixed the colors yellow and blue together to make green paint. It is important to note that pigments are chemicals that absorb selective wavelengths. There are the Primary Colors of Pigments (Subtractive Primaries) which include magenta, yellow, and cyan. When white light (composed of red, green, and blue light) shines on colored paint, only some of the wavelengths of light are reflected. Cyan paint absorbs red light but reflects blue and green light; yellow paint absorbs blue light but reflects red and green light. When cyan paint is mixed with yellow paint, you see green paint because both red and blue light are absorbed and only green light is reflected. Different colors of light have different wavelengths; thus, due to a chemical’s constitution, certain colors can be reflected and others are absorbed. This is really the basic overview of how by mixing pigments we could create green.
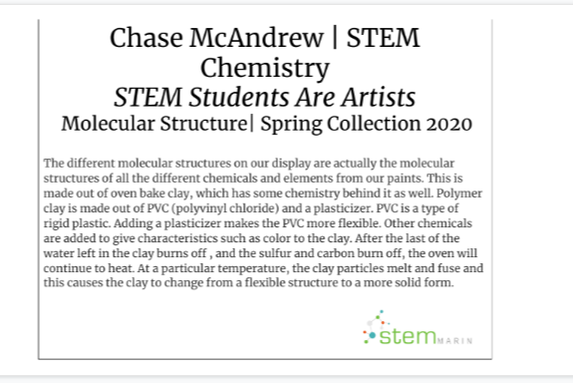
The Chemistry Behind Baking Clay
We also seized the opportunity to research the chemistry behind oven bake clay, which is what we used to create the sculptures on the back of our display. Essentially polymer clay is made out of PVC (polyvinyl chloride) and a plasticizer. PVC is really just a type of rigid plastic, but by adding a plasticizer makes the PVC more flexible. This is why clay can be molded and is also very soft to the touch. After placing the clay into the oven, the last of the water left in the clay burns off , and the sulfur and carbon burn off, and the oven will continue to heat. At a particular temperature, the clay particles melt and fuse, this will eventually lead the clay to change from a flexible structure to a more solid form. Hence why the sculptures we created were soft before they went into the oven, and they were solid when they came out.
We also seized the opportunity to research the chemistry behind oven bake clay, which is what we used to create the sculptures on the back of our display. Essentially polymer clay is made out of PVC (polyvinyl chloride) and a plasticizer. PVC is really just a type of rigid plastic, but by adding a plasticizer makes the PVC more flexible. This is why clay can be molded and is also very soft to the touch. After placing the clay into the oven, the last of the water left in the clay burns off , and the sulfur and carbon burn off, and the oven will continue to heat. At a particular temperature, the clay particles melt and fuse, this will eventually lead the clay to change from a flexible structure to a more solid form. Hence why the sculptures we created were soft before they went into the oven, and they were solid when they came out.
Place Cards
To complete the whole project, each member of my group made a place card that had brief summary of the contributions they made to our art piece. The four areas that we focused our energy on was the yellow reaction, blue reaction, baking clay, and the green reaction. The place cards also include necessary chemical equations and simple definitions of some terms that were covered in the duration of our project. These place cards were eventually placed on the top of our display so when people are walking by they can read about all the work we did and how it relates to science, more specifically chemistry. Below are images of the placecards we created to be displayed with our art.
|
|
Reflection
Two skills that I utilized in this project was leadership and work ethic/productivity. The first skill that I performed well was taking a leadership role in our group. A specific example of when I successfully used this skill was the first day of our project. We had just been assigned our groups, and no one really knew what to do or where to start since this project was a very broad assignment. I took control of the table group and started by telling everyone that we should make a list to brainstorm ideas. I threw out some ideas that I was thinking about, and from there everyone else started calling great ideas out. This was a good skill for this project, because it was one that really demand someone to keep everyone on track and direct the efforts simultaneously so we would have a cohesive final product. The second area that I did well in was my work ethic and productivity. A specific example of when this was shown was the last weekend before our project. I looked at the work we had done and what we needed to complete by the presentation date, and realized that we needed to all step up to get the project finished on time. I carved out specific tie in the day to work on my part of the project, while also editing and helping out the rest of my groups work. I utilized my time wisely and efficiently to get everything finished. This was helpful definitely during the last week of project work time, as I mentioned in the example above, but also throughout the project I made the most of each day we had.
Two skills that I will continue to improve upon for the next project are attitude/demeanor and critical thinking. The first skill that I need to work on is attitude and demeanor. A specific example of when this became an apparent problem to me was when my group was trying to make the paint for our display. I had been tasked with making a green precipitate for some paint, but after 3 attempts all I had made was three different shades of blue. I noticed that I became very pessimistic about how to solve this continuous problem I was having, and it seemed to rub off on the group a little. The next day, we came back together and were able to make the green paint that we needed but I still feel like I should have been more optimistic for a better ending. In the future I will be more optimistic about outcomes for projects by thinking about how much I have already accomplished and how much I should be happier about. The second skill that I will keep working on is critical thinking. A specific time when I knew that I was struggling with this skill was during the research stage of our project. I was not able to find out how to balance the chemical equations of the reactions we were going to be using. I spent a few days trying to get the math correct while also working on my artwork, but I was not doing my solving in the most time efficient way. I had a lot of available resources that I ignored and from this I suffered the consequences of falling behind on my work and being completely confused. One of my teammates was able to help me in the end, and we completed the equations in time for our presentation. In the future I will use my critical thinking skills to first think of all the materials I have available and work from there to to solve my problem.
All in all this was a really fun project. I had a great time learning the science behind art and how chemists really are artists in their own special way. I loved working with my group and we had so much fun letting our creative sides combine with our science to create some awesome art.
