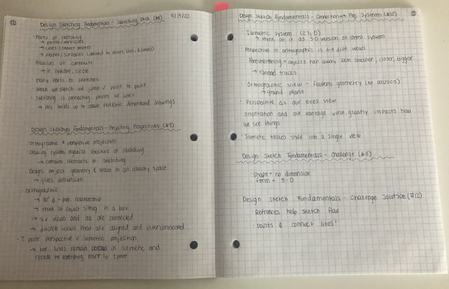
In this step of our deign process, we focused on conceptual sketching and alternatives for our project. There was a lot of revisions that we had to make in this step from taking into account the feedback from our mentors and from our teacher. There were many assignments that we did during this process, and we also had the opportunity to work individually on our sketching skills. Below are the parts to our Design Step 2.
|
Step 2, Part 1
1.Brainstorm on your journal and padlet to determine at least three feasible alternatives (concepts) for each function/subfunction of your product and assemble the results in a classification scheme. 2. Functionally decompose your product. 3. Form three promising design concepts by combining compatible function-subfunction alternatives/concepts from your classification scheme |
Step 2, Part 2
1. Firm up your three design concepts by sketching them in the form of conceptual drawings and by implementing the techniques learned in the sketching tutorials. On paper and Digitally 2. Technical sketching tutorials |
Focusing on technical drawings was a new challenge for me. Since this step consisted of more individual work, I really had to rise to the occasion to meet the deadline and genuinely learn all of the information. It was a very reflective process and I learned a lot about my skills, which I will discuss further in my reflection section. There were some challenges, however, that my group and I faced which mostly consisted of communication. We had to work diligently with each other to finish our parts of assignments, set up Zoom meetings, and meet the rapidly approaching deadlines.
For design Step 2, we had many different assignments in this part of our project. We had to create classification schemes, brainstorm alternative designs, create technical sketches, and functionally decompose our product. These assignments were all interesting and helped us better understand the different functions and sub functions that our product is capable of. We had roughly 2 weeks to complete all of the steps above, and finish up all of the past steps of the first design step. However, the Gantt chart that we developed was a life-saver in the end as it helped direct our energy and divide up the tasks at hand. The rest of this write up will showcase my technical drawings and other components of the design process.
For design Step 2, we had many different assignments in this part of our project. We had to create classification schemes, brainstorm alternative designs, create technical sketches, and functionally decompose our product. These assignments were all interesting and helped us better understand the different functions and sub functions that our product is capable of. We had roughly 2 weeks to complete all of the steps above, and finish up all of the past steps of the first design step. However, the Gantt chart that we developed was a life-saver in the end as it helped direct our energy and divide up the tasks at hand. The rest of this write up will showcase my technical drawings and other components of the design process.
Design Step2, Part 1
For this part in our design process, my group and I really focused on imagining our product, what it would look like, and all of its functions. The first part of this step was to brainstorm ideas and alternatives. This took us back to our trusty Padlet, and we continued to add ideas, images, and other things to help direct our focuses. The Padlet is an ongoing living document and is always going to be updated and we are always going to add new information or ideas as they come along to that outlet. Below is the link to our Padlet.
Then, after compiling our ideas into one place, we picked three of our most promising ones and continued with our design process. We created a classification scheme to organize our functions, sub functions, and alternative concepts. A classification scheme is the product of arranging things into kinds of things (classes) or into groups of classes. In the abstract, the resulting structures are a crucial aspect of metadata, often represented as a hierarchical structure and accompanied by descriptive information of the classes or groups. We included a written explanation of our through processes in this step as to why we chose these concepts and also included some vague sketches of what some of the sub-functional components may look like.
However, after gaining insight from our instructor and mentors later in the week, we found ways to revise our classification scheme. Our mentor did not have any feedback for us, he thought that we had a solid set up. He really liked the concepts that we created, and we talked about the limitations of some of the ideas we had. However, for the classification scheme as a whole, he had no edits for us and was very supportive of the direction we are headed in for this project. We added some of our own changes to make sure we could create viable and useful feasible concepts. We also included some important vocabulary in regards to our product and audio engineering. The initial classification scheme and our revised classification scheme can be found below.
However, after gaining insight from our instructor and mentors later in the week, we found ways to revise our classification scheme. Our mentor did not have any feedback for us, he thought that we had a solid set up. He really liked the concepts that we created, and we talked about the limitations of some of the ideas we had. However, for the classification scheme as a whole, he had no edits for us and was very supportive of the direction we are headed in for this project. We added some of our own changes to make sure we could create viable and useful feasible concepts. We also included some important vocabulary in regards to our product and audio engineering. The initial classification scheme and our revised classification scheme can be found below.
|
First take of classification scheme
|
Final take of classification scheme
|
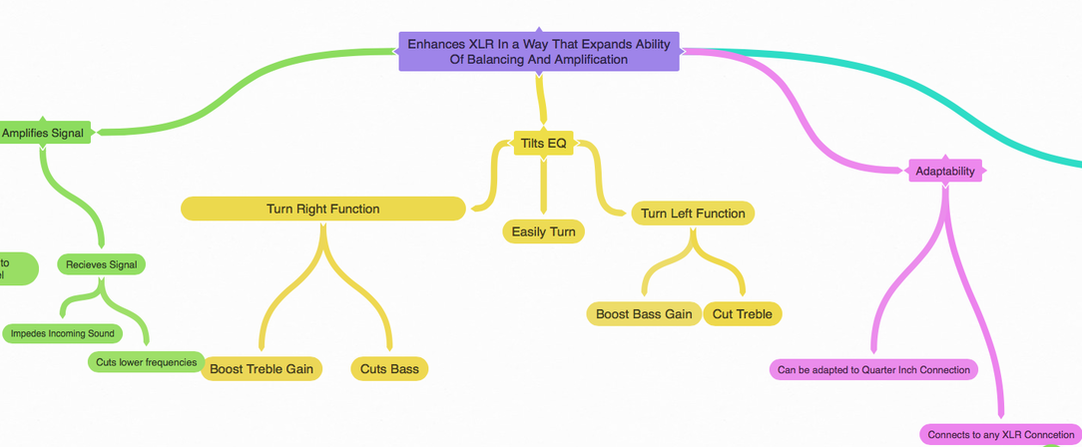
Another step in this part of the design process was to functionally decompose our product. What is the process of Functional Decomposition? Functional decomposition is a term that engineers use to describe a set of steps in which they break down the overall function of a device, system, or process into its smaller parts. As this is an engineering class, we did this process to gain a deeper knowledge of how engineers work and how to better improve/understand our own product. We used an online software to make this assignment more interactive and collaborative with our group. The online software we used was called Coggle and used it to create a group flow chart how the functions and sub functions of our product will work. Below is an image of our decomposition and it is accompanied with a link to the actual interactive flow chart.
After dissecting the functions of our product, and also identifying promising ideas, the next step was to create solid alternative ideas. To do this, we simply used our classification scheme and connected different concepts together that weft would be compatible. This was a very fun process as we got to be creative and design a product that had all of the vey best parts to it. Additionally, we added our rational behind the products we designed and why these alternatives could be used to create a unique and human centered design process. We mixed and matched the ideas, as you will see in the document attached below. The concepts that we combined are visually connected as we highlighted them in the same colors to show their groupings.
Here are descriptions of the possible designs we will create; we tried to include our thought process to help clarify why we chose these three design specifically:
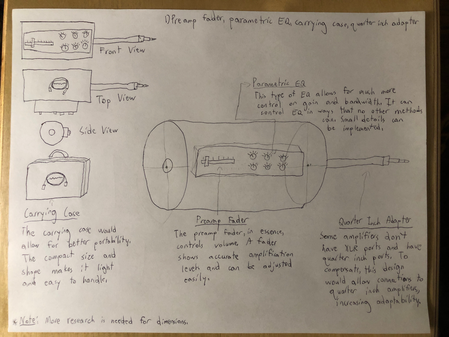
Preamp fader, parametric EQ, carrying case, quarter inch adapter
We chose this design primarily because of the parametric EQ function. Parametric EQ is the most flexible choice for balancing sound because it allows the control of all the factors of equalization (amplification, bandwidth/Q, center frequency). While it will be more difficult to learn for amateur musicians, it’ll open up more opportunities as a result. The carrying case allows for portability and the quarter inch adapter will allow it to connect to amplifiers without an XLR port and electronic instruments. Lastly, the preamp fader will allow for controllable amplification of the overall sound and a clear projection.
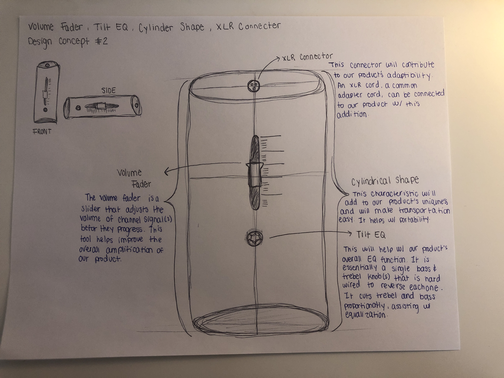
Volume fader, tilt EQ, cylinder shape, XLR connector
We chose this design, as we believe that it encapsulates the very idea of a human centered design. A fader would allow us to change the volume of the channel signals. This is a simple control which varies the amount of resistance and therefore the signal level. The tilt EQ would be a one knob system and help balance out the audio in a simpler form since it is one appliance. The cylinder shape is something we are drawn to, as we believe it would be a more unique and compact shape to design our product after. It is easy to store, and would be easy to transport or hold. The XLR connector would also be ideal in a product, as it is a common connecting system and would allow more people to use it on the output end. It is also a great alternative for balancing audio.
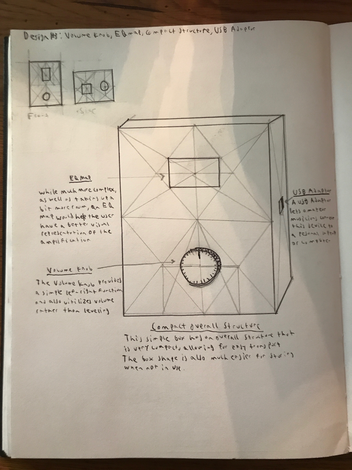
Volume knob, EQ map, compact overall structure, USB adapter
The volume knob is more intuitive both because of its simple left right functionality and its use of volume as opposed to level. An EQ Map, although much trickier to assemble and taking up more room would be very helpful for visual representation of the amplitude at certain frequencies. Compact overall structure is important for both the use and target audience that we pin pointed in market research because amatuer musicians need something portable. A USB adapter would be useful for any sort of amatuer recording using a personal laptop or PC.
Design Step 2, Part 2
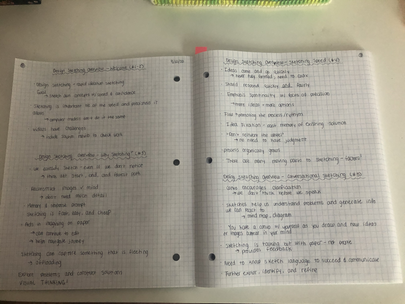
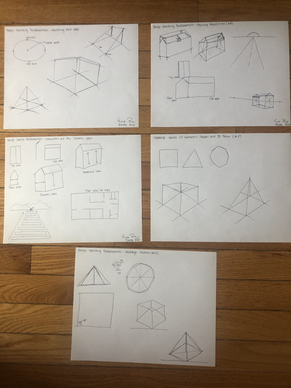
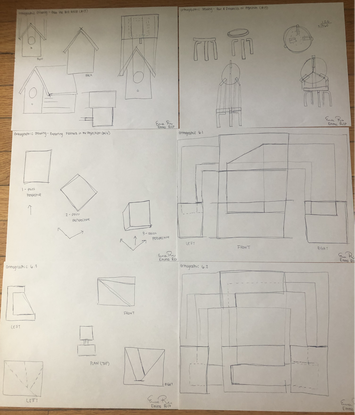
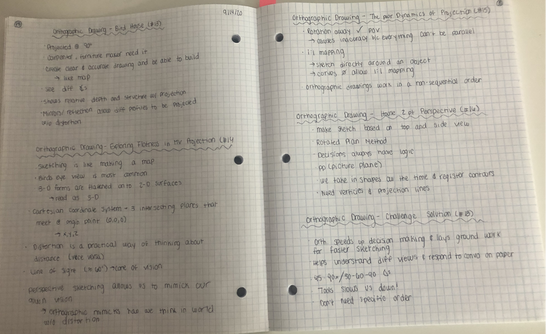
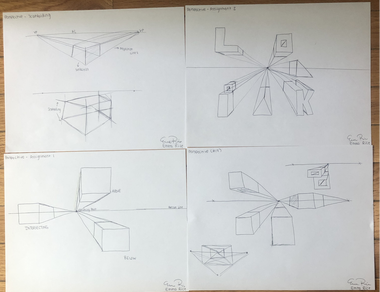
The next part of our design process was to work individually on our technical drawing skills. We were assigned many different challenges, instructional videos, notes, questions, and practice opportunities to improve our technical drawing skills. To be frank, it was a lot of work to complete. Because of this, our drawings were split into two parts over a two week period. The first part of our drawings included four instructional assignments which were under the topics of Technical Drawing 1 &2, Orthographic Drawing, and Perspective sketching. Below are my sketches and corresponding notes from the first batch of technical sketches.
Technical Drawing 1
|
|
Technical Drawing 2
|
|
Orthographic Drawing
|
|
Perspective Drawing
|
|
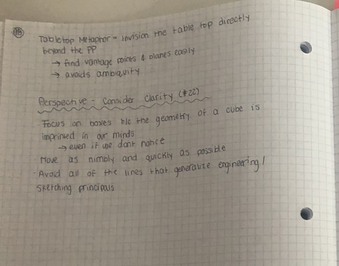
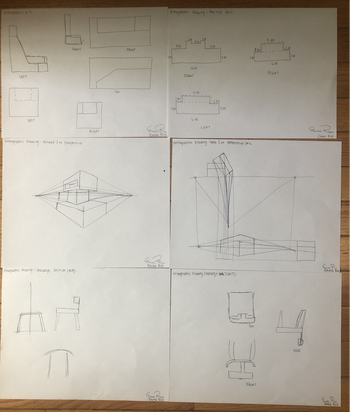
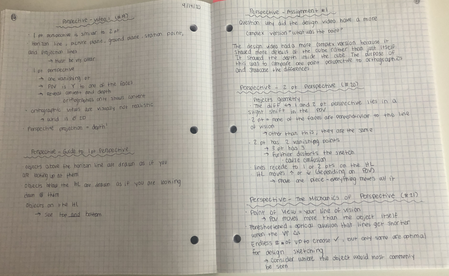
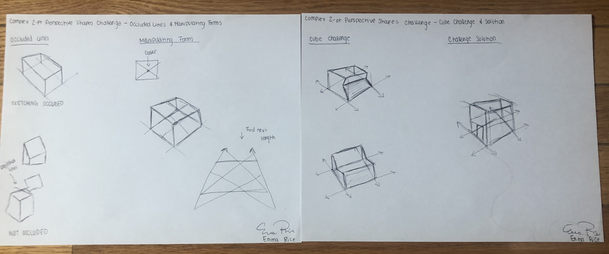
The next part of our drawings were separated into another four categories. These videos began to take on a new level of sketching, after covering the bases. The sketching tutorials I did for this part included Complex 2 Point Perspective, Rectangular Planes With Centers, Curved Surfaces, and my own product design. The notes and sketches from these lessons are found below.
Complex 2 Point Perspective
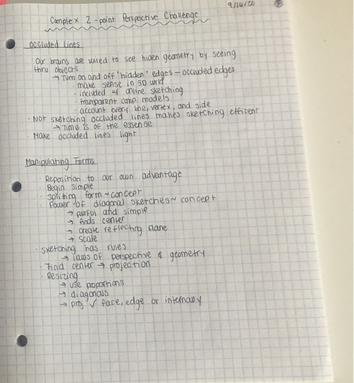
|
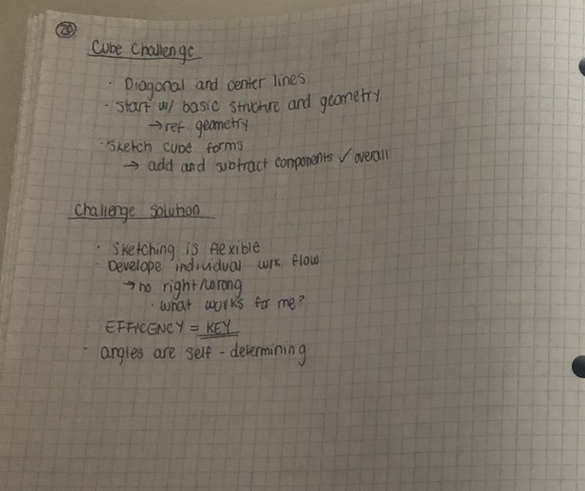
|
Rectangular Planes With Centers
|
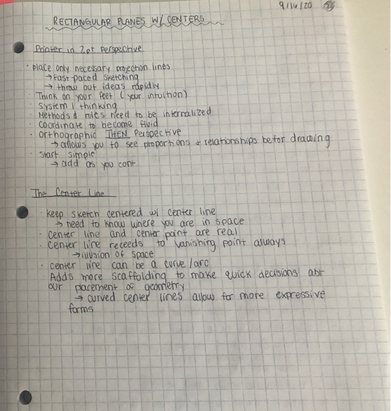
|
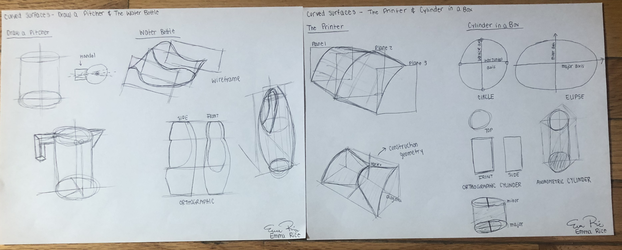
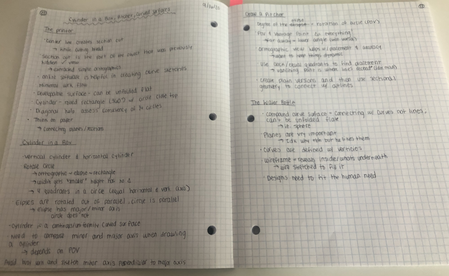
Curved Surfaces
My Own Graphic Design
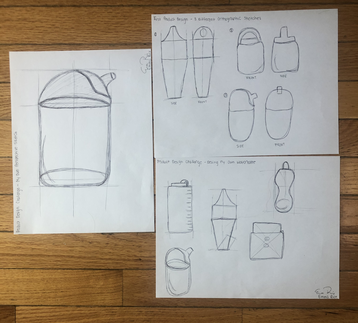
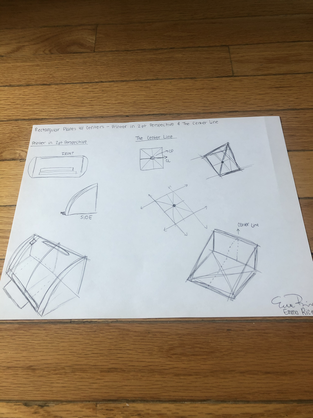
After sketching and learning all of the tricks that engineers use when conceptually drawing ideas. Technical drawing is a much more complex process than it seems, and is a way to get your ideas from your mind to paper and eventually design them to be a reality. The last part of our design step 2 was to sketch our own product, using the skills we learned from our individual sketching journeys. The sketches below are ones that we created based off of our imagination and taking into account the design specifications from our three design selections assignment. The three sketches can be found below.
My group and I are very happy with how our sketches turned out! I can defiantly see an improvement in my sketching skills from the beginning of this process. Our sketches, however, do not include any measurements. My group and I feel that we need to research in more depth just what the size of our product will be. There are a lot of uncertainties, so for our initial concept sketches we did not feel confident enough to add dimensions for that reason.
Reflection
This design process really tested our limits and our individual drive. Two skills that I excelled using were time management and creative thinking. The first skill that I preformed well was time management. An example of me using this skill successfully was throughout the process of drawing ur individual technical sketches. This activity required patience and initiative to complete on time. There was a lot to do, and we had other assignments at the same time. I found time everyday to chip away at the work in front of me, and in the end I was able to meet the deadline. I was really impressed with myself when I saw how much my sketching had improved since the beginning videos. The second skill that I preformed well was creative thinking. An example of when I used this skill well was when we were designing our classification scheme. It was touch to think of so many alternative concepts for one main function, so I had to really push myself to look in a new perspective. I did just that, and with the additionally input from my teammates, we were able to design our classification scheme on time and find some neat alternatives for our product.
While I did shine in some skill areas, there is always room for improvement. Two skills that I still need to work on are collaboration and communication. The first skill that I still need to work on mastering was collaboration. An example of when this skill was lacking for me was in the creation of our Coggle flow chart. I did not contribute as much as I should have on this assignment, and I know that my contribution would have been helpful in the long run. In the future, I will make sure to help in any way I can with smaller assignments to help my group succeed more efficiently and also to improve my own knowledge of audio engineering. The second skill that I still need to work on is communication. An example of when my lacking in this skill area became apparent was when we had a miscommunication with what time our mentor was supposed to meet with us one Saturday. He was flustered and we had to start our meeting later than intended, and in general our lack of communication with him and follow up texts ended badly this time. I understand that he is doing this voluntarily, so we need to respect what days he can meet with us and make an effort to organize them better. In the future, I will make sure that we send remind messages to our mentors to be more respectful and also use the time we have to the best ability.
All in all, I had a good time in this step of the design process. I was able to grow as a drawer, which is something I really liked and enjoyed, but also gain a better understanding of our product and its appearance and functions. So far, my team is amazing to work with and I am looking forward to what lies ahead of us this semester!
