For this step in our design process, my group and I had an eventful few weeks. In Design Step 4, we designed and carried out trials/experiments for our product we are creating. We completed this design step by working with one of our mentors, and a lot of collaboration and cooperation with each other. On top of our group assignments, we were also tasked with individual programming activities for 3D modeling and understanding how to use online circuits. Below are the different parts to our Design Step 4.
|
Step 4, Part 1
|
Step 4, Part 2
|
We were introduced to new software in this part of the design cycle. Tinkercad is a similar modeling software to Onshape, however our use of the site was different. We used Tinkercad to develop and edit online circuits. This was an extremely important activity for us, and helped a great deal with our own experimental side of this design step. Additionally, this was a reflective process for me to test my own software skills and expand my knowledge. My group and I had a lot of difficulty with the experiment side of this design step. Since we had to do all of the tests and data recording virtually, it was more complex and difficult to get in to. We had limited knowledge of using such online softwares for our experiments, so it was a learning moment for everyone. I will talk about this further in my reflection section.
In Design Step 4, my group and I had less assignments but they all required a lot of time and effort to complete. The first assignment we had was to create a plan and set-up for our experiment we wanted to create. After establishing our goals and such, we had to run the experiments, which is where we encountered a lot of issues and challenges. Next, we complied all of our work and data into a formal lab report that we turned in at the end of our unit. Individually, we were tasked with completing more Onshape 3D modeling tutorials. Two new softwares were introduced to us, and those were called Tinkercad and Simscale. I completed these assignments by myself, but working with my team was rewarding and productive when we had the opportunity.
In Design Step 4, my group and I had less assignments but they all required a lot of time and effort to complete. The first assignment we had was to create a plan and set-up for our experiment we wanted to create. After establishing our goals and such, we had to run the experiments, which is where we encountered a lot of issues and challenges. Next, we complied all of our work and data into a formal lab report that we turned in at the end of our unit. Individually, we were tasked with completing more Onshape 3D modeling tutorials. Two new softwares were introduced to us, and those were called Tinkercad and Simscale. I completed these assignments by myself, but working with my team was rewarding and productive when we had the opportunity.
Step 4, Part 1
The first assignment we had for this design step was to create a detailed experiment/test plan and set-up document. This set up was supposed to organize our work for our experiment, outline the procedure, explain our variables, and provide an overview of our experiment. In the scientific method, an experiment is an empirical procedure that arbitrates competing models or hypotheses. It must also control the possible confounding factors, any factors that would affect the accuracy or repeatability of the experiment or the ability to interpret the results. The document below is the plan we sent to our teacher describing our experiment. There are some excerpts from our report below this document for reference.
Experiment Overview
In this experiment, we will be setting up a preamp circuit and observe changes in multiple areas of sound. We’ll be studying the changes in voltage and amplitude of a sine wave. The purpose of this experiment is to understand what a circuit needs to function and how we can apply it to the broader scope of our product. We also need to create a deeper understanding of the other aspects of our project. This is why we analyzed the effect of the EQ on the bass amp.
Apparatus
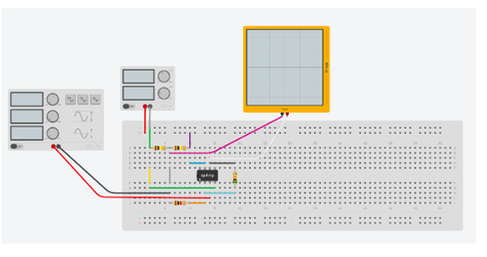
This experiment will be conducted using Tinkercad. The preamp circuit will be designed and simulated virtually. For the preamp circuit, we will need four resistors and a 741 integrated circuit. We will also need a 9 volt battery to power the circuit, an audio input, in this case a function generator, and a method to measure the output voltage, in this case an oscilloscope. For specific strengths of the resistors, capacitors and transistors you can see the sketch below. We also use a Fender Rumble 15 amplifier and a Squier P Electric Bass as well as an iphone 8-plus microphone.
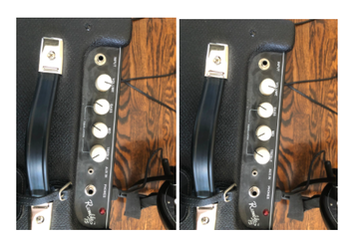
After creating our plan, the next step was to actually put the plan into action. To run our experiments, we were limited in the manner in which we could collect data. Our product is quite complex, and has many detailed components that we as high schoolers in the time frame of three days cannot realistically do tin real life. To combat this issue, my group and I decided to use online software on Tinkercad that would let us simulate an electric circuit. We also ran another experiment that measured the tone of a music instrument by adjusting the EQ knobs. We used a guitar and recorded a short sound and assessed the EQ levels and how our changing them affected quality or delivery. Below is an image of the Tinkercad circuit we created, and an image from when we were adjusting the EQ levels from our second experiment.
|
|
|
This is an image of the online circuit we made on Tinkercad
|
This is an image of the EQ knobs we adjusted during our trials
|
In full disclosure, we had a tough time getting data from our experiments. Using the online software, we found it difficult to run the simulation successfully. Our circuits were made from scratch, so figuring out how to complete them and in a way where we would get reliable data was a process. It was very helpful to have our mentors on hand for this kind of problem. They set up meetings with us and guided us through the faults and kinks of our circuit.
Results
The results to our three experiments can be found below.
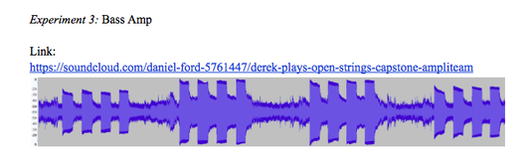
The following image shows amplitude measurements of the four different bass parts of the experiment. The experiment involved playing the four open strings on a bass at different levels of EQ. The three knobs we adjusted were bass, mid, and treble. The first section had the three knobs turned all the way down. The next three had only bass turned up, only mid turned up, and only treble turned up, respectively. The experiment shows that different notes became louder and quieter depending on the equalization. This can further be heard in the actual recording in the link above or found with the quick access button below.
Step 4, Part 2
After accumulating our results, we needed to interpret them. We did this by writing up a formal lab report. In this report we reviewed the reasons for our investigation, our procedure, results, and completed a discussion section. We included many images in our report as well, which showed our experiments and what kind of circuits we worked with. Below id our final report that we completed.
Below is an excerpt that explains our results, along with a conclusion regarding the overall experience and findings bright to light from our work.
Discussion
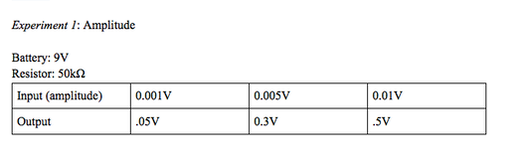
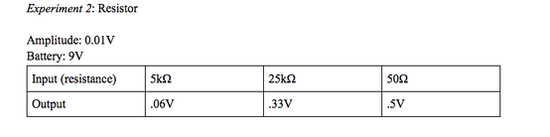
Our experiment has given us a much better understanding of the way these preamp circuits function. We better understand different types of circuits, and the different ways a circuit can go wrong. With this knowledge, we can better set up successful circuits and have a little more control over our outcomes now that we know what will come out of the circuit. The voltage increased in a way that makes sense theoretically when the resistance increased, and the voltage was amplified at a rate that was predictable. We also have a deeper understanding of EQ due to our additional experiment on Bass Amp EQ.
Conclusion
The preamp circuit we built amplifies signals by roughly 50 times with a 9V battery. This easily crosses the threshold from mic level to line level, making it efficient. We also saw that increasing resistance also increases amplitude. Using this knowledge, our next step is to incorporate potentiometers, which are variable resistors that can change resistance. We can also use our new knowledge of the effect EQ can now help us move forward in our project and the next circuit.
We had to follow a specific guideline for how to structure our report. Below is the criteria we were graded on for the lab report.
The lab reports must include 2 experiments, and the following:(For details look here):
- Cover Page
- Abstract: (Communication) gives a quick, complete summary of the experiment and its conclusions. Less than 400 words.
- Table of Contents
- Introduction: (Communication and Critical Thinking) provides background and theory for the experiment; shows what the experiment will find and why it is needed. States Discovery Question. (“big picture” questions your report addresses become the focal point as you write your report.)
- Method: (Communication and Critical Thinking) gives a complete description of the apparatus, equipment, and procedure which was followed in the experiment. (include sketches)
- Results: (Communication and Critical Thinking) describe the data obtained when the method was performed; shows uncertainties. (graphs tables
- Discussion: (Communication and Critical Thinking) is your interpretation of the results and describes them like a story.
Appendix
The report, most importantly is a proof our our work. As engineers it is stressed that you record your work and find ways to present your information so you have evidence. Our work we completed with these experiments will aid us with the rest of our design steps in this class. Our next mission is to present the work we have completed thus far, so we will be using these three experimental results to back our product and its viability.
Individually, we were assigned tutorials to complete to improve our online software skills. A new aspect of our individual online software was using Tinkercad. Tinkercad is a free, online 3D modeling program that runs in a web browser, known for its simplicity and ease of use. Since it became available in 2011 it has become a popular platform for creating models for 3D printing as well as an entry-level introduction to constructive solid geometry in schools. For us, we utilized the online circuit simulations that the program also offers. Simscale is another new program we worked with. It is an extension software for Onshape, so it was neat to see how else we can use the softwares. SimScale is a computer-aided engineering software product based on cloud computing. We had many tutorials to accomplish for each of these programs. We also did numerous tutorials of 3D modeling with Onshape, as we have before. Below is a list of tutorials we used.
Onshape Tutorials
|
|
Simscale Tutorials
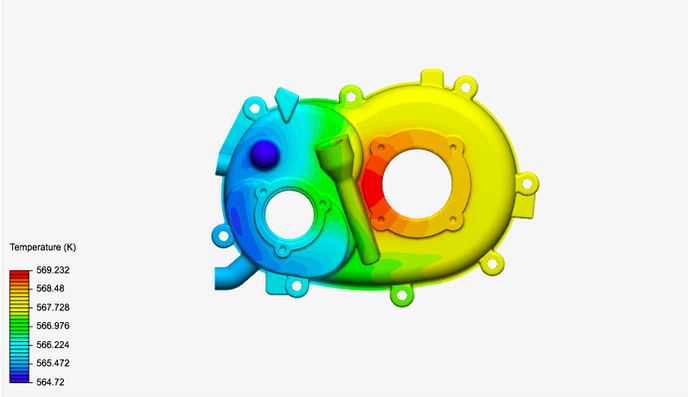
Image of one of my Simscale tutorials
|
Simscale was very helpful in understanding the kinds of tests we can run virtually. The image to the left is a step by step tutorial that I completed. I ran a test that measured the temperature at different areas on the wrench, after I differed the material and changed the stress it experienced. This kind of technology and virtual testing allows me and my group to have a wider range of tests we completed or how we present our final product if we render it online. |
Tinkercad Circuit Simulation Tutorials
Tinkercad took me by surprise. I did not know that this software allowed you to create virtual circuits. The image on the right was one of the tutorials I completed that showed me how to add different components of an electrical circuit in the program. While online circuits have limitations to reality, my group used Tinkercad in our experiments and it was very useful. |
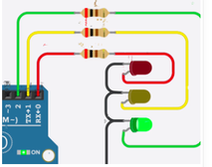
Image of one of my online circuits
|
Reflection
This step of our design process tested a lot of our limits and work ethic. Two skills I used well in this step were communication and collaboration. The first skill that I used well was communication. A specific example of when I used this skill well was at the end of the project. It was one of our last work days, and my group and I had some concerns about what we needed to complete for our assignment. I made the initiative to talk with my teacher and discuss what we had done and what we needed to additionally do. He helped guide us to the finish line, and it was this communication that allowed my group to confidently turn in our assignment. The other skill that I used well in this design step was collaboration. A specific example of when I used this skill was the last day we had to work on our assignments. I worked with one other team member and we finalized our work we needed to turn in. I worked on formatting and he did the same thing. Our communication and collaborative effort was what helped us complete the assignment in a reasonable time. It was really cool seeing how well and quickly we worked together when we collaborated and made the effort to work together.
There is always room to improve, and this design step did not present my finest moments. Two skills that I need to work on for our next design step is time management and creative solutions. The first skill that I need to improve on is time management. In these weeks that we had to work on this design step, my group and I strayed from our gantt chart, and it showed. A specific example of when my lack of time management hurt our progress was the second week in our design step. My group and I needed to move forward, but we had not completed our experiments. It was stressful because we had not distributed the work effort, and I did not help the situation. One of our amazing team members helped with organizing and setting up our experiments that we needed to complete, but I feel guilty of how little I helped. In the future, we will make sure to utilizes our gantt charts to avoid al the work falling on one person and make our time together less stressful. The second skill that I will continue to improve upon is creative solutions. A specific example of when I did not use this skill well was when we were running our experiments. We had a very hard time making our experiments work and have reasonable data to work with for discussion. I really had no idea how I could help my group, and did not contribute as much as I would have liked when we talked as a group about what we could do to fix the issue. I don't know much about circuits, but I should have done more and been more creative. In the future, I will make sure that I do everything I can to contribute to conversations. I want to help lead this team to success and I know that creativity is an important factor in that.
All in all, this was a stressful but rewarding design step. I tested my boundaries, and was able to see my own faults in problem solving and time management. I am very excited to see what the future holds for Ampliteam, and we are so close to finishing. I know we can do it!
