In this project, we covered a lot of lessons that were all connected to our main project which was designing the new STEM building for San Marin. Some topics we reviewed were the Earths layers, the solar system, solar angles, atomic structure, day lighting techniques, and how electricity can be produced. The main question that my group and I had for this project was, how will we incorporate all of these elements of knowledge into our final design? To answer this question we had to use each working day we had in class to the fullest, and understand all of the content involved. Some of the steps we went through to complete the final part of our project, was a lot of mini projects about our lessons in class. They included a model of our solar system, designing a day lighting model, learning about atomic structures, and creating a class justification document that was about why would we want to reduce the amount of electricity we use and how is electricity produced? After all of these sub-projects, my group and I had a much greater understanding of the earth and how to produce a well thought out design for a final product.
In this project, we covered a lot of lessons that were all connected to our main project which was designing the new STEM building for San Marin. Some topics we reviewed were the Earths layers, the solar system, solar angles, atomic structure, day lighting techniques, and how electricity can be produced. The main question that my group and I had for this project was, how will we incorporate all of these elements of knowledge into our final design? To answer this question we had to use each working day we had in class to the fullest, and understand all of the content involved. Some of the steps we went through to complete the final part of our project, was a lot of mini projects about our lessons in class. They included a model of our solar system, designing a day lighting model, learning about atomic structures, and creating a class justification document that was about why would we want to reduce the amount of electricity we use and how is electricity produced? After all of these sub-projects, my group and I had a much greater understanding of the earth and how to produce a well thought out design for a final product.
|
Earth's Layers:
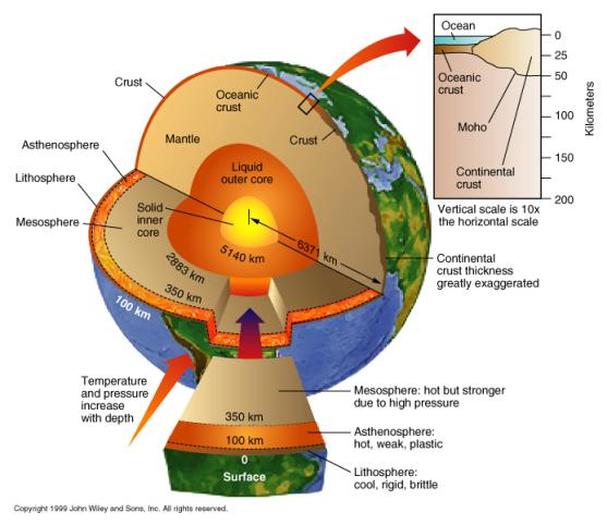
The first content section we covered in class was the Earth's Layers. The main thing we learned was that nobody really knows what the Earth looks like beyond our crust, but we have an idea of what it looks like. We talked about earthquakes, and how seismographs showed us that the Earth has some sort of solid core on the center as well as covering the Richter Scale and how it works. The Earth's crust is roughly 4,000 miles from the solid core, 700 miles from the mantle, and 3,200 miles from the outer core (liquid). Many scientists have tried to dig into the Earth, and through the layers, but have never succeeded past 7.5 miles. This expedition was carried out by Russian scientists, and took about 20 years to complete before they ended their experiments. |
|
Model of Orbits:
|
|
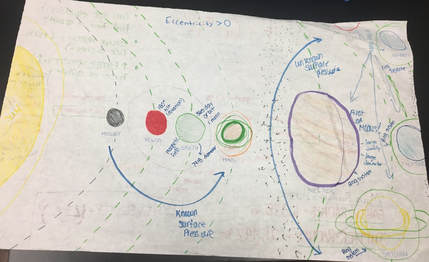
The first thing we covered in this section was the universal gravitation, that covered tangential velocity, which is the velocity of an object turning, so this was helpful when talking about orbiting. Then we learned about satellite motion that explained why satellites do not just fall into what they are orbiting, how they are launched, and simply how they orbit something.
For this we were first instructed to draw a model of our solar system any way we wanted. Then our teacher continued to ask us to redesign our model to make it more specific each time, until it was much more detailed than our original model. The picture on the left is our model that we added more facts and precise measurements to each time. Every time we added a new part to the model we used a different color so we could see our progress.
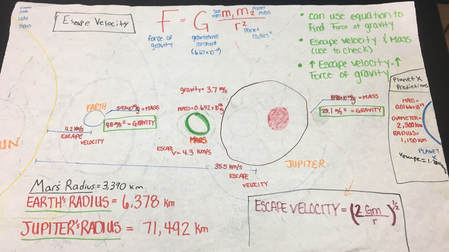
The third part of this lesson was picking a phenomena using three or more factors of space from a NASA link about our planets and solar system. The four planets we used as factors for my group were the Sun, Earth, Mars, and Jupiter because they were all different sizes and in different places in the solar system. We used the equation F= G (m1m2)/ r^2 for my groups phenomena, and after we solved our phenomena we presented it to our class in our groups.
For this we were first instructed to draw a model of our solar system any way we wanted. Then our teacher continued to ask us to redesign our model to make it more specific each time, until it was much more detailed than our original model. The picture on the left is our model that we added more facts and precise measurements to each time. Every time we added a new part to the model we used a different color so we could see our progress.
The third part of this lesson was picking a phenomena using three or more factors of space from a NASA link about our planets and solar system. The four planets we used as factors for my group were the Sun, Earth, Mars, and Jupiter because they were all different sizes and in different places in the solar system. We used the equation F= G (m1m2)/ r^2 for my groups phenomena, and after we solved our phenomena we presented it to our class in our groups.

|
Day Lighting Design Model:
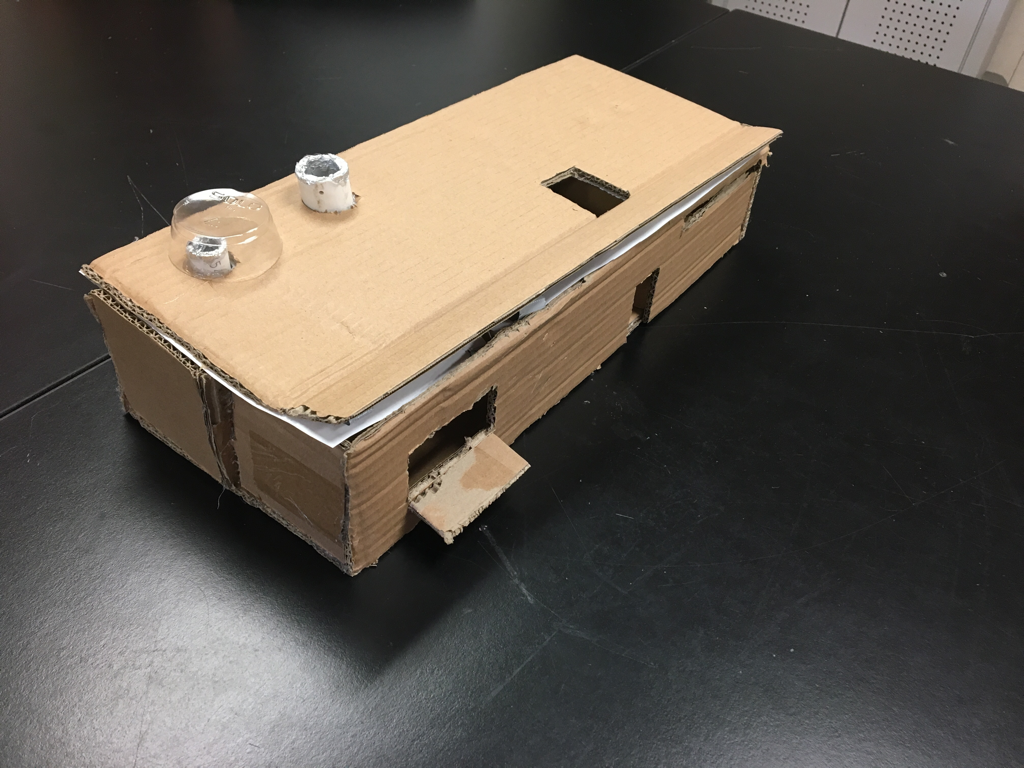
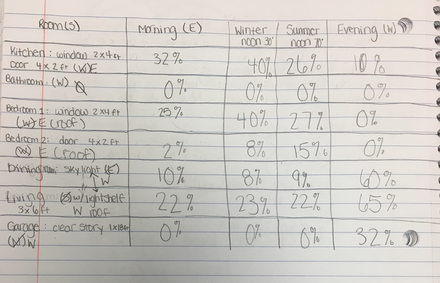
Before my group and I created our model we, as a class, learned about solar angles so when we built our final product we could utilize as much of natural as we could. We were given a packet that showed us different lighting techniques to use on our model. Then we spent about a week or two building our model, which was a 1,000 ft^2 home. We used all of our natural lighting techniques in it. We included a light shelf, two solar tubes, a skylight, and a clerestory window. The materials we used were PVC tubes, hot glue, cardboard, white paper for a reflective ceiling, and plastic cups. The final part of our project was to shine a light bulb at different angles, that represented the sun at different times of the day, over our house. We gathered the data by estimating how much light was being shinned in each room with percentages. We took this information and created a CLEAR paragraph on what the most effective time of the day and lighting technique worked the best. The paragraph included a data table of our findings. This lab helped us experiment which of the day lighting techniques worked the most efficiently and consistently. We later used this knowledge to include some of them in our final project of the new STEM building design. |
|
To the right is the chart that my group and I used to put our percentages in order. The chart also has the locations of our rooms in the house/model we built, and the angles we held the light bulb up at. It also has the times of day we used in this experiment. Although the human eye is not the most accurate tool to use for experiments with light, we also had a more accurate tool that read/found the exact percentage of light in the room so we compared our guess to that to find our final percentage.
|
|
Atomic Structure:
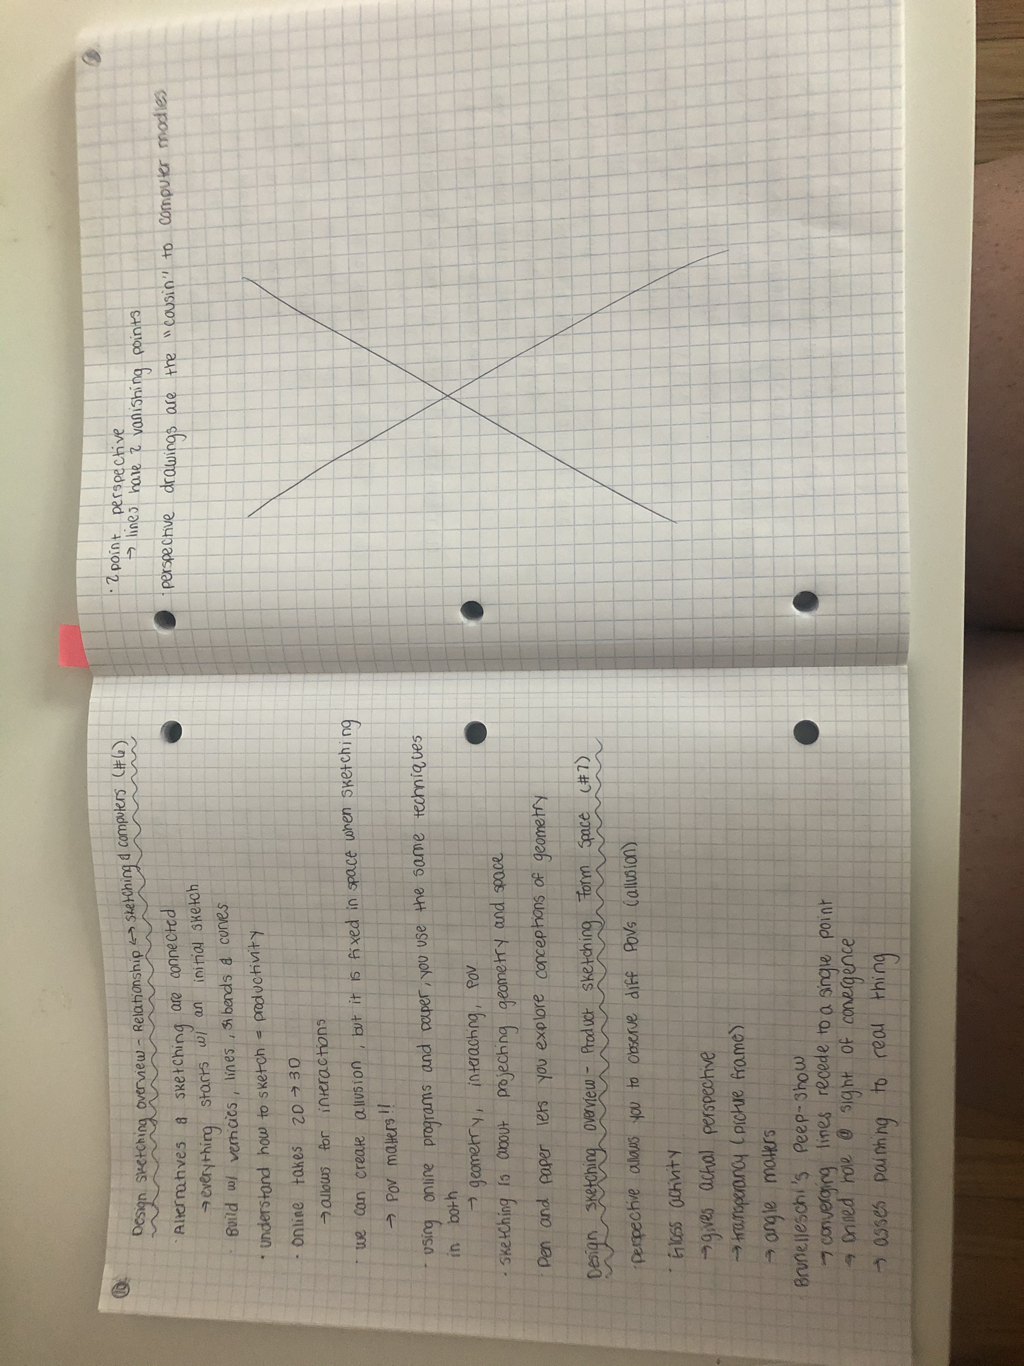
In this part of our project we took notes on atoms, subatomic particles, heat, and molecules. We learned that atoms are crazy small, and that humans don't actually know what they look like. Molecules are two or more atoms bonded together, for example water or nitrogen. They are also wildly abundant. Next we learned about heat and molecules. We talked about how heat is a form of energy, and that all heat is due to movement or vibration of molecules. Below are some photos of our notes on atomic structures etc.
In this part of our project we took notes on atoms, subatomic particles, heat, and molecules. We learned that atoms are crazy small, and that humans don't actually know what they look like. Molecules are two or more atoms bonded together, for example water or nitrogen. They are also wildly abundant. Next we learned about heat and molecules. We talked about how heat is a form of energy, and that all heat is due to movement or vibration of molecules. Below are some photos of our notes on atomic structures etc.
|

|
Justification Document:
The justification document that we created was a class contribution, and my group and I worked on solar and wind power. In the document is also why would we want to reduce the amount of electricity we use and how is electricity produced? Here is our class justification document below.
The justification document that we created was a class contribution, and my group and I worked on solar and wind power. In the document is also why would we want to reduce the amount of electricity we use and how is electricity produced? Here is our class justification document below.
These projects may seem random and very different but, they are all in fact connected. They are all connected to the main project of this unit, which is designing the new STEM building for San Marin. The first content section we covered was the Earth and it's layers. This connects to the building design, because we needed to know what we would be designing our building on and what circumstances California has in geographical terms. The next section we covered was the solar system and the orbit of planets. This connects to the building design, because the orbit of planets effect how the sun hits the Earth, the pattern of the Earths orbit, how other planets affect our planet and so on. These aspects are important because they all connect to how light gets to Earth and how seasons are made, which leads into our next section. The next section we covered was day lighting techniques and solar angles. This was important to know for the building design, because we needed to know how the heat from the sun will affect our building, and also how to utilize as much natural light as possible. Then we learned about the atom, and the atomic structure. This connects to the building of our design, because atoms and molecules make up all of our objects we would be using so it is important to understand how different objects react to certain setting, temperatures etc. The last part we covered was electricity and energy. This was important because it gave our whole class a sense of how we can obtain different forms of energy and how we can use it efficiently in our building design.
STEM Science Building Redesign:
|
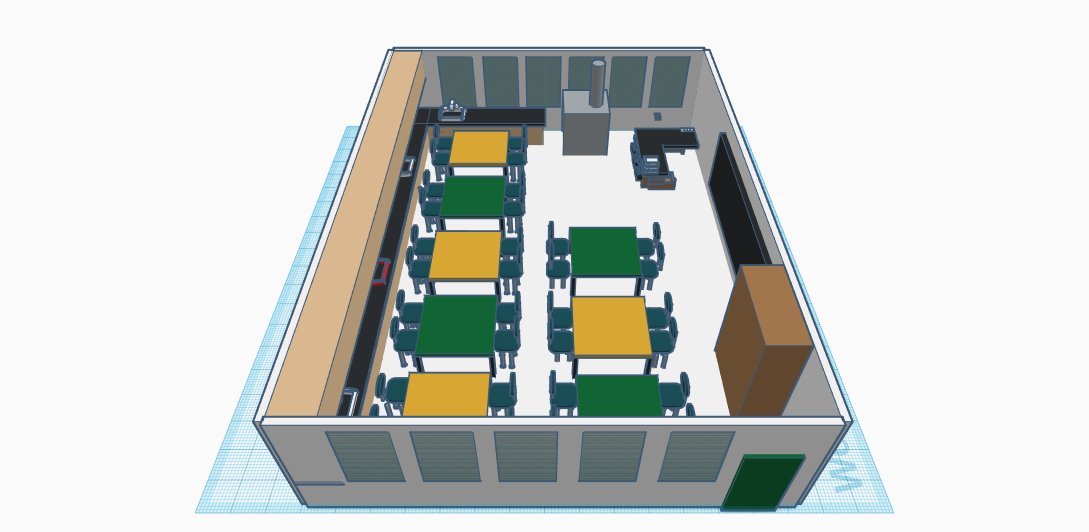
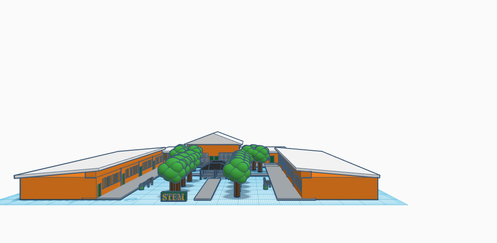
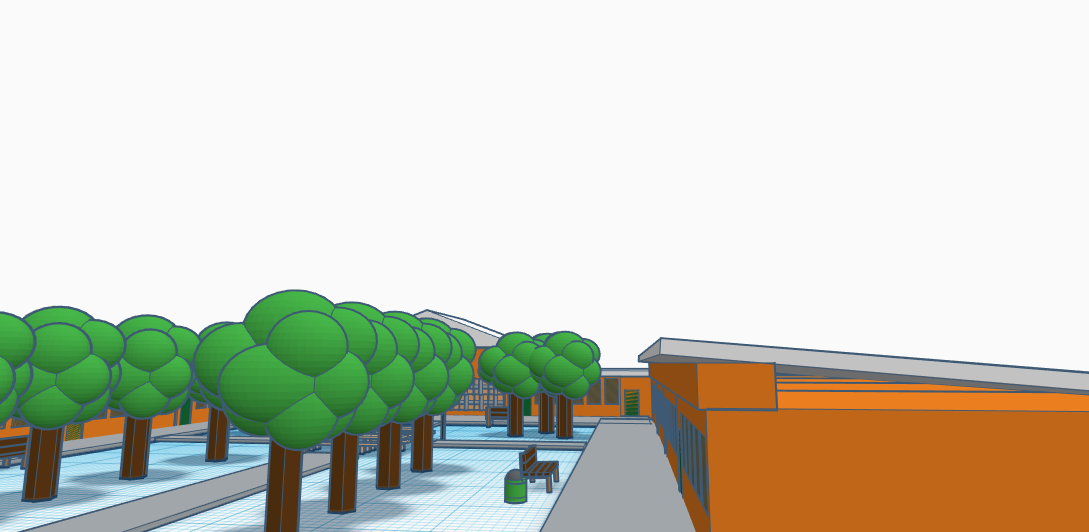
Finally, the main project of this whole lesson was to design the new STEM science building for San Marin. At the right and on the bottom of my writing, you can see some of the rooms that my group and I created on the 3D modeling website called Tinker Cad. There was a shared document that our teacher gave us, that included some of the details about the needs of each classroom and other logistics. The rooms shown below and at the right are some of the rooms we envisioned such as a student center, the physics/chemistry classroom, biotech classroom, and the prep/storage room.
The first rooms we rendered were the physics and chemistry rooms. As you can see to the right there is a photo of what our chemistry room looks like, and our physics room is the same layout only it does not have a fume hood. These two classrooms are similar because they asked for the same aspects with a few exceptions. We have 8 standard tables that hold four kids in a group, and the tables are San Marin's school colors, and we added the component because we thought it was a subtle gesture to the social life on campus and it shows spirit. There are four sinks, one with hot water, and lots of storage, cabinet space, and working areas in the room. The most important feature in all of our rooms we created is that all of the furniture is easy to move and the rooms are multi purpose ( this was a very stressed point when we were given the requirements for each classroom). |

Student center
Chemistry room
|

|
|
Storage room Biotech room
Above is my groups final presentation that we used when we presented our ideas to a panel of architects that are going to be actually building the new STEM building.
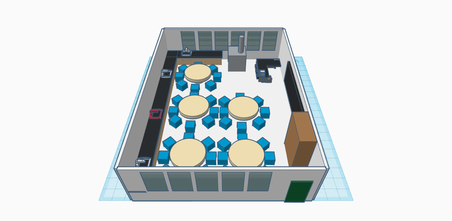
The next classroom we created was the bio technology room. This room had many requirements and specific aspects that the teachers wanted. We tried our best to incorporate all of the clients needs in this model. In this room we have a lot of the basic parts of a classroom, and all of the previous materials in the chemistry and physics rooms. The biggest change we made to this classroom was adding circular tables and comfortable blue chairs for the students. In the descriptions of the classrooms the bio technology room wanted an interactive environment so we thought that adding a different edge to these rooms would help create a creative space for these students/ fun learning environment.
|
This to the left is the outside design of our science building. We made it three separate buildings and it has a spacious outside learning space and working area for students. The blueprint including all of our interior plans is located in our final presentation slideshow above.
In this project we applied all of our prior knowledge from the projects listed throughout this page, to create our final project. It included natural day lighting techniques such as clerestories, solar tubes and so on. More information can be found in our slideshow. The last step in this project was to present all of our ideas and findings to a panel of architects who will be designing and building the actual STEM and Science building for San Marin. |
Reflection
This project tested a lot of boundaries, comfort zones and the ability to work with a group for over 2 months. Two skills that I improved on were leadership and time management. The first skill that I improved on in this project was leadership. A specific example of when I showed this skill was when one of our group members was out one day, and it seemed that nothing was getting done, so I pulled my group together and got us back to work and focused by assigning tasks and goals for the day. The second skill I improved upon during this project was time management. A specific example of when this skill was applied was when the deadline for our project was approaching, and a lot of other groups were rushing to finish their presentations, but our group was dialed in and ready to present.
Even though I did well in those skill areas, in the future I still need to work on presenting our information and communicating with my group. The first skill I need to work on is presenting our information. An example of when this became a problem was during our presentation to the panel of architects who were judging us, my group and I were explaining our final product but were beginning to run out of time so some of us started to rush or skip over important aspects of our design. To prevent this problem from happening again I will make sure my group and I are fully prepared for our presentation and know exactly what we are going to say when we go up to present. The second skill that I need to improve on still is communication with my group. An example of when this became an issue for my group was when one of my team members and I miss-communicated on who was bringing in supplies and working on our 3D model. We got through this complication, but it did set us back a bit on our schedule. To prevent this in the future I will be very specific with my group about who is in charge of a task and so on.
All in all this project was a huge success! I loved the concept and thought process that we had to go through, and it made me excited about our new STEM building. I hope in the future more of my classes do large scale projects like this one.
